Aim of this article:
How to localize liferay portlet. We are going to develop a custom portlet which explain how to localize our portlet.
Why need to localize a portlet?
For international audience we required to localize the user interface. Localizing your portlet’s language is done using language keys for each language you wish to support. You can translate these manually or use a web service to translate them for you.
Good to know the difference between localization and internalization.
Internationalization also known as I18n is the process of separating locale dependencies from an application’s source code. Examples of locale dependencies include messages and user interface labels, character sets, encoding, and currency and time formats. Localization, also called L10n is the process of adapting an internationalized application to a specific locale. An application must first be internationalized before it can be localized. Internationalization and localization make a JEE application available to a global audience.

Follow below steps to localize your portlet
Step 1:
There should be resource-bundle tag in your portlet.xml file . Sample portlet.xml is given below
<?xml version="1.0"?>

<portlet-app xmlns="http://java.sun.com/xml/ns/portlet/portlet-app_2_0.xsd" xmlns:xsi="http://www.w3.org/2001/XMLSchema-instance" xsi:schemaLocation="http://java.sun.com/xml/ns/portlet/portlet-app_2_0.xsd http://java.sun.com/xml/ns/portlet/portlet-app_2_0.xsd" version="2.0">
<portlet>
<portlet-name>localization-demo</portlet-name>
<display-name>Localization Demo</display-name>
<portlet-class>
com.liferay.util.bridges.mvc.MVCPortlet
</portlet-class>
<init-param>
<name>view-template</name>
<value>/jsp/view.jsp</value>
</init-param>
<expiration-cache>0</expiration-cache>
<supports>
<mime-type>text/html</mime-type>
<portlet-mode>view</portlet-mode>
</supports>
<resource-bundle>content/Language</resource-bundle>
<portlet-info>
<title>Localization Demo</title>
<short-title>Localization Demo</short-title>
<keywords></keywords>
</portlet-info>
<security-role-ref>
<role-name>administrator</role-name>
</security-role-ref>
<security-role-ref>
<role-name>guest</role-name>
</security-role-ref>
<security-role-ref>
<role-name>power-user</role-name>
</security-role-ref>
<security-role-ref>
<role-name>user</role-name>
</security-role-ref>
</portlet>
</portlet-app>
Line number 19 is important. Whats the meaning of that line? It simply means that there should be content folder under your src folder. It also says that there should be Language.properties under content. This is the minimal requirement to support language file.
Step 2:
Do you want to support Spanish? Create a Language_es.properties in content folder
Do you want to support Arabic? Create a Language_ar.properties in content folder
……. ……….
So on……….
Here es means Spanish, ar means Arabic. These are called language code. Why we have prefixed Language? Because we have mentioned it in portlet.xml.
Do you want to know the various language code?:-
You can browse the Liferay source code. In Liferay source code under portal-impl/src/content folder you will see all the language files. Visit the below links to know more
http://oracle.com/technetwork/java/javase/locales-137662.html
https://translate.liferay.com/pootle/
Whats Language properties should contain:-
It should contain only key=value pairs. For translation of different languages you can use Google translator.
Step 3:
In your JSP access the key as below code
<%@ taglib uri="http://java.sun.com/portlet_2_0" prefix="portlet" %>
<%@ taglib uri="http://liferay.com/tld/ui" prefix="liferay-ui" %>
<portlet:defineObjects />

<p>
<!-- welcome is the key in properties file -->
<liferay-ui:message key="welcome"/>
</p>

<p>
<!-- We are passing one argument to properties file -->
<!-- sample-text-with-one-param is the key which accept one argument -->
<liferay-ui:message key="sample-text-with-one-param" arguments='<%=new String[] { "Foo" }%>' />
</p>

<p>
<!-- We are passing two arguments to properties file -->
<!-- sample-text-with-one-param is the key which accept two arguments -->
<liferay-ui:message key="sample-text-with-two-param" arguments='<%=new String[] { "Param1","Param2" }%>' />
</p>
Step 4:
Now you need to test the functionality. Add language portlet in your page. Translate your portal for those languages as you implemented in the above and check whether its translating your portlet or not.
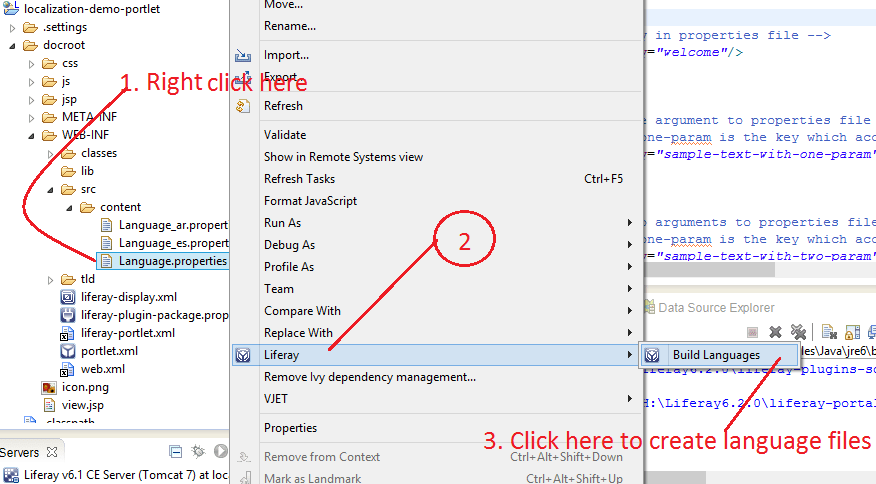
You can generate all the language files using Liferay IDE. Follow the steps as in below screen shot.